How To Take Apart Brita Pitcher: Complete 5-Step Solution
Last updated on January 2nd, 2023
If you have used a Brita water filter for any length of time, you are aware that, over time, the filter itself will become dirty, even though it cleans the water that passes through it. You use a water filter; cleaning is a necessity that you should never put off.
Then comes the question: how to take apart Brita pitcher?

The Brita filter requires a separate tank, which must be separated. You need to switch the screen if you haven’t already. It’s good hygiene to replace the filter often; otherwise, it can harbor germs and other contaminants that could make you sick.
However, if you’re set on keeping the screen, all you have to do to keep it clean is replace it. Here we have the step by steps guide for how to take apart Brita pitcher.
Table of Contents
🧮 How to take apart Brita pitcher?

You should change the regular Brita water filter every couple of months. This filter will provide you with almost 40 gallons of water before it needs to be replaced. In the event of the variation, you should replace it every six months to supply almost 120 gallons of water. Until then, it will continue to function normally. Please keep in mind that these statistics are based on the typical application.
Here are the details steps by steps How To Take Apart Brita Pitcher:
💧 Wash Lid and Reservoir
To start the process of taking apart the Brita pitcher, first, take off the lid and clean it thoroughly. After that, Wash it in the sink using hot water and a dishwashing liquid or soap that meets the standard. Wipe with a washcloth or sponge so that it fits in the gap between the lids closely.

If it has an electronic device on the lid that acts as the filter’s indicator, make sure it is not submerged in water. Those who own chrome pitchers with push-on lids know the telltale signs of a dirty pitcher: tiny bits of debris and residue accumulate over time on the shiny surface.
For those who enjoy gazing at their reflections on the glistening surfaces of Instagr, it can be a lively place. This problem, fortunately, is straightforward to resolve.
💧 Vinegar Mixture to clean: How To Take Apart Brita Pitcher
Combine one teaspoon of white vinegar and one tablespoon of water in a mixing container. Yes, this mixture is used to kill any present mold signs. It can also use vinegar of white color to polish chrome with good results.

If the chrome lid has a heavy coating of dirt, increase the amount of vinegar you pour on it. Use a brush that is not abrasive to slowly and carefully buff the lid until it is clean.
Rub the top of the jar in a circular motion to remove any streaks of indicator, and then allow the lid of the jar to dry naturally. It is not necessary to apply chrome polish or anything similar.
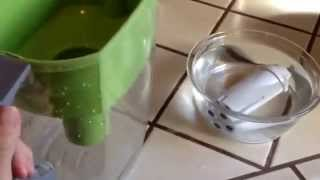
💧 Remove filter
The vinegar will evaporate, leaving behind a clean, gleaming lid free from fingerprints. Remove the filter from your product and set it away. There is no requirement to clean the filter. If the filtration process requires it, rinse with some warm water.

To prevent further contamination with mold indicator spores, place the filter on a surface that has been thoroughly cleaned. Please remove the container, wash it thoroughly, and check for any indicators.
💧 Remove the container
If you have a pitcher, remove the container that holds the cold tap water and place it in the sink. Remove it using a soft cloth dampened with lukewarm water and a gentle detergent. Wipe the interior and exterior of the holders, as well as the electronic device and indicators that hold the filter’s reservoir.
💧 Clean the Reservoir
Do not wash in the dishwasher
Wash the lid and pitcher by hand, and avoid electronic gadgets with buttons. Clean the sink pitcher by rinsing it with hot soapy water. Brita pitchers made of plastic cannot resist being filled with water already boiling. Therefore, you should not clean the Brita filter by placing it in the dishwasher.

💧 Use gentle products to clean
Doing so can cause the pitcher to melt and deform, rendering it worthless and causing the electrical device to become dysfunctional. When cleaning indicators are needed, use gentle soap and a delicate cloth. To clean the jug, use a clear dishwashing liquid that does not require scrubbing.

Any dishwashing liquid, including light detergents, can be used successfully with this product. Instead of steel wool or other coarse abrasives, you should use a soft cloth or sponge. Some examples of dish soap liquids that are gentle and simple to use include Dawn, Palmolive, and Joy.
Place the lid and the container in a cup of water to keep the lid. It would help if you used dish soap liquid to wash each component separately, and then you should rinse the parts in cold water.
🍃 Drying
You can dry your product’s lid and container by hand or hang them up on a clothes rack. Use a cloth that is completely dry while you are drying the pitcher by hand. Flip it over and set it on a drying rack or clean towel on a flat surface.

If this is not possible, leave the lid and container on the drying rack for at least one to two hours until they are burnt; otherwise, the mold indicators may appear again. If you dry the pitcher with a towel, there is a chance that the lukewarm water will contain a few microscopic fibers.
Before putting any components back in the jars, you must ensure they are scorched. It will help prevent the growth of mold in the jars. We advise that you store the components in the rack. If you are short on time, you can ensure that there are no stray fibers of fabric left in the product by drying the jug with a paper towel instead of a cloth towel.
👉 Prepare a new filter
After you have emptied the contents of the product’s container and allowed it to dry, you will need to make a new filter to use in the meanwhile. It is possible that you will not need to soak the Brita filter before washing it. The newest model of the Brita Filter does not require soaking before cleaning, unlike the older model.

Before cleaning, you should do the following:
- Before cleaning, you should read the instructions that came with the cold tap water filter that you have.
- Pour cold water through a new Brita filter for 15 seconds, and then place the water in a pitcher.
- Put the lock on the filter to make sure it stays secure. It is essential to examine the instructions for your particular Brita filter model to see whether it is necessary to prime the filter with cold water.
🎯 Assemble the Pitcher
You assume it has dried out by this point and the container is prepared. It is time to reassemble the pitcher so that you can obtain water with a fantastic flavor from your Brita stream.

Tip:
It is advisable to repeat this process at least twice, and all of the indicators need to be confirmed and free of loose carbon dust.
Pour cold water up to the edge of the jug and spread it to eliminate any leftover carbon dust or heavy metals. During this step, Carbon dust, also known as black specks, can be found in the filter of the faucet, and purifying it can result in cleaner and better water.
Before you stop, check to see if the water from the tap is clear. It indicates no carbon in the water, making it much purer and better tasting. Your specific model of Brita pitcher will determine whether you need to perform any additional procedures to reassemble the device.
💡 Frequently Asked Questions

What can be done to remove mold from a Brita pitcher?
Using liquid detergent and hot water, scrub the pitcher and its parts. A solution of white vinegar and water should eliminate the mold. If that doesn’t do the trick, try using watered-down bleach. Scrub the entire thing, especially the spout and the housing, using a brush.
Does a Brita pitcher with algae in it pose any health risks?
If you’re wondering if the algae in your Brita filter is dangerous, consider that algae are plants. I’m afraid that’s the case. Water that has been contaminated by algae is not fit for human consumption. This is because some algae produce toxins that can result in gastrointestinal distress, diarrhea, skin irritation, and even vomiting.
Also Read: Springwell vs Pelican
⭐ Conclusion
Here we have given you the details on How to take apart Brita pitcher. It can easily remove all Heavy metals such as cadmium, mercury, copper, and other contaminants. You can also remove other contaminants. It also helps to minimize the odor and flavor typically associated with tap water, which may be rather unpleasant.
It is capable of absorbing chlorine, which leads to a reduction in the quantity of chlorine present. Your Brita water filter may need to be replaced more frequently than usual, depending on your water.
Because of this, you can rest assured that your water pitcher will continue to operate at a high level of efficiency. Moreover, if the water source features hard water, your filter will need to be replaced more often.

How To Test For Phosphate In Water: Ultimate Guide 2023

Does a whole house water filter reduce water pressure?

Why My Water Softener Constantly Draining?
About Author
Admin
In this blog, I write experienced-based reviews and information about water filters which help to the audience to reach the best and most reasonable water filtration system for their homes.